Dental Pain Eraser, Professional Chairside Kit
Item #DPE-C300
$307.99
Description
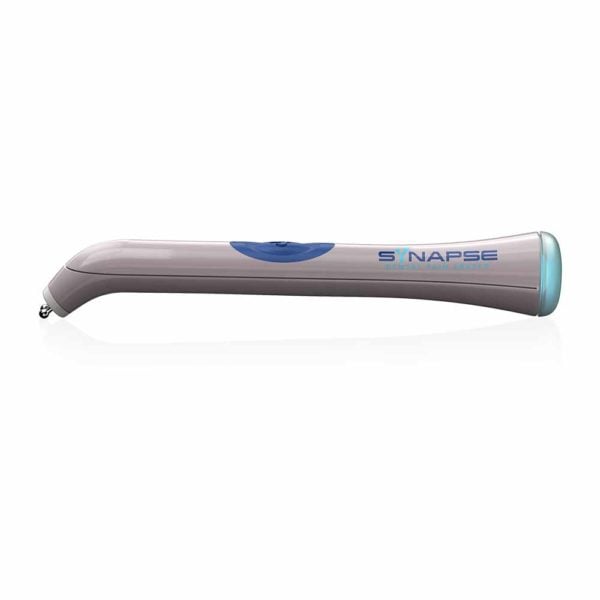
Synapse Dental Pain Eraser
Blocks pain using Advanced Pulsewave Technology™
The Dental Pain Eraser is an innovative, non-invasive tool designed for pain management in dental treatments. It uses advanced technology to relieve pain quickly and effectively, lasting up to 48 hours. This pen-like device emits gentle electrical pulses to block pain at the nerve ending. It’s ideal for a variety of dental procedures, from orthodontic adjustments to minor restorative treatments. The kit includes the Pain Eraser device, autoclavable tips, and a protective cap, making it a convenient option for both dentists and patients.
Chairside kit includes: 1 Dental Pain Eraser, 4 Autoclavable Tips, and Protective Cap
Ideal for Orthodontics:
- separator placement
- bracketing, delivery, wire, and aligner adjustments
- debonding and adhesive removal
- buccal, mucosal, tongue and lip ulcerations
- post extraction pain
- osteoperforation
- interproximal reduction
- pre-needle application
- intraoral muscle/TMJ pain
and General Dentistry:
- pre-needle application
- tooth pain/sensitivity
- minor restorative treatment
- crown/veneer cementation
- scaling and root planing
- post-extraction pain
- tooth fracture
- aphthous ulcer
Product Videos
The Dental Pain Eraser
Debonding with the Dental Pain Eraser
Interproximal Reduction with the Dental Pain Eraser
Orthodontic patient relief with the Dental Pain Eraser
Traumatic Ulcer Pain and the Dental Pain Eraser
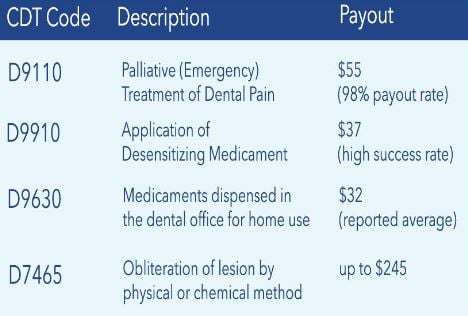
Reimbursement Codes
Instructions
Clinical Scenario Based Instructions
Pain management using Advanced Pulsewave Technology™
Click HERE to download a PDF copy of these instructions.
ORTHODONTIC PAIN
Case Observation:
A patient presents to the office the day after placement of orthodontic appliance insert with the chief concern of tooth pain related to the pressure of the braces preventing them from sleeping, eating or being able to go to work.
- Cover the Dental Pain Eraser (DPE) with a dental sleeve (this sleeve is not provided in the package with the device) and expose only the 2 probe ends.
- Turn the device on by pressing the on button. You will see a blue light that will stay on for 1 second, this means the device is now powered ON.
- (Once the blue light starts blinking, the device is ready to use) Place the two metal probes on the area of gum tissue (gingival attachment) visualizing the roots of the teeth you are trying to relieve the pain.
Using slow light contact, move the probes up and down the whole root surface visualizing as you are “erasing” every part of the root surface vertically and side to side.
A good analogy is think of painting a pole with slow smooth motions not missing painting any areas, similarly applying to all the root surface.
Clinically it has been shown that you only need to do the front side (labial/buccal) of the tooth, but if the tooth pain is on the back tooth (molar), it may be necessary to do the back side (lingual/palatal) of root also. On average it takes about 10 seconds per tooth. - Move to the next tooth that may be experiencing discomfort and apply the pain “erasing” in the same manner. Orthodontic pain is related to “areas” of pain and there are usually several teeth together in the area.
- Ask the patient to bite gently and rate the level of pain or pain relief and if there any areas that need more attention. Reapply as needed to any additional areas or over the existing areas for a second round until the patient experiences relief.
Pain is titratable, meaning that several teeth may require reapplication due to hypersensitivity and with re-application, over 96% of patients have shown significant pain relief. - Turn off the device by holding the power button for 2 seconds. The blue light will blink three times meaning the device is powering OFF.
- Discard of the dental sleeve used on the device for treatment, clean the device, and put the protective cap (provided in package) back on the device. Store the device in packaging box.
HYGIENE CLEANING AND PERIODONTAL DEBRIDEMENT
Use at cleaning appointments (scaling, root planing, ultrasonic scaling) or in day-to-day dental pain scenarios (cold pain/tooth pain/cracked tooth diagnostics, canker sores and others) to make treatment in the office pain free. The Dental Pain Eraser provides a new non-pharmacologic tool that will speed up appointment time/efficiency, improve patient satisfaction and still allow for re-imbursement.
Case Observation:
A patient with severe sensitivity comes in for an appointment after not being seen for several years. The patient usually requires local or topical anesthetic use to complete debridement and cleaning.
- Cover the Dental Pain Eraser (DPE) with a dental sleeve (sleeve is not provided in device package) and expose only the 2 probe ends. If the device will be prescribed to the patient for take home use, there is no need for dental sleeve coverage as the DPE is designed for home/health use and cleaning similar to a toothbrush.
- Turn the device on by pressing the on button. You will see a blue light that will stay on for 1 second. This means the device is now powered ON.
- (Once the blue light starts blinking, the device is ready to use) Pre-apply the sub-sensory probe tips along the gingival and mucosa along the whole root surface for around 10 seconds per tooth starting on the buccal going around the buccal/ facial. Using slow light contact, move the probes up and down the whole root surface visualizing as you are “erasing” every part of the root surface vertically and side to side.
A good analogy is think of painting a pole with slow smooth motions not missing painting any areas, similarly applying to all the root surface. - Continue to the lingual for 10 seconds per tooth along the gingival and up/ down root surface of each tooth (20 seconds total per tooth).
- Ask the patient to bite gently, or apply light air/water to the tooth and rate the level of pain or pain relief and if there any areas that need more attention. Reapply as needed to any additional areas or over the existing areas for a second round until the patient experiences relief.
Pain is titratable, meaning that several teeth may require reapplication due to hypersensitivity and with re-application, over 96% of patients have shown significant pain relief. - Turn off the device by holding the power button for 2 seconds. The blue light will blink three times meaning the device is powering OFF.
- Discard the dental sleeve used on the device for treatment, clean device, and put the protective cap (provided in package) back on device. Store device in packaging box.
TOOTH PAIN & MINOR CARIES CONTROL
Tooth pain related to minor operative procedures that are radiographically limited in dentinal depth or incipient/minimal caries, chipped/broken tooth edge or cusp, post-operatives sensitivity (reversible pulpitis) following restorative procedures.
Case Observation:
A patient presents with a Class V caries lesion on the upper right premolar and is experiencing pain during chewing due to missing portion of amalgam restoration on the adjacent first molar causing sensitivity to air/cold water that goes away quickly.
- Cover the Dental Pain Eraser (DPE) with a dental sleeve (this sleeve is not provided in the package with the device) and expose only the 2 probe ends. In cases that the device will be prescribed to the patient for take home use, there will be no need for the dental sleeve coverage as the DPE is designed for home/health use and cleaning similar to a toothbrush.
- Turn the device on by pressing the on button. You will see a blue light that will stay on for 1 second. This means the device is now powered ON.
- (Once the blue light starts blinking, the device is ready to use) Dental hypersensitivity to cold water and air due to broken restoration and cusp tip, leaving dentin, will require application of the Dental Pain Eraser directly on intact enamel or dentin surface. Place the two metal probes at the midpoint of buccal surface of the posterior teeth or the mid-facial surface of the anterior teeth. Apply the Pulse-Wave for 20 seconds per tooth to ensure blocking pulpal pain signaling fibers.
Special note: Ensure you are on natural tooth surface. Large restorations will affect the ability to transmit pain blocking potential to pulpal nerves. Envision how to apply signal on tooth to avoid blocked signal effect (Place more gingivally or on cusp not affected by restoration).
If there are large restorations, or there is poor conduction in the tooth, place the two metal probes on the area of gum tissue (gingival attachment) visualizing the roots of the teeth you are trying to relieve the pain. Using slow light contact, move the probes up and down the whole root surface visualizing as you are “erasing” every part of the root surface vertically and side to side.
Clearly apply to full length of root surface buccal and lingual for 30 seconds like painting a pole.
A good analogy is think of painting a pole with slow smooth motions not missing painting any areas, similarly applying to all the root surface. - (Once the blue light starts blinking, the device is ready to use) Dental hypersensitivity to cold water and air due to broken restoration and cusp tip, leaving dentin, will require application of the Dental Pain Eraser directly on intact enamel or dentin surface. Place the two metal probes at the midpoint of buccal surface of the posterior teeth or the mid-facial surface of the anterior teeth. Apply the Pulse-Wave for 20 seconds per tooth to ensure blocking pulpal pain signaling fibers.
Special note: Ensure you are on natural tooth surface. Large restorations will affect the ability to transmit pain blocking potential to pulpal nerves. Envision how to apply signal on tooth to avoid blocked signal effect (Place more gingivally or on cusp not affected by restoration).
If there are large restorations, or there is poor conduction in the tooth, place the two metal probes on the area of gum tissue (gingival attachment) visualizing the roots of the teeth you are trying to relieve the pain. Using slow light contact, move the probes up and down the whole root surface visualizing as you are “erasing” every part of the root surface vertically and side to side.
Clearly apply to full length of root surface buccal and lingual for 30 seconds like painting a pole.
A good analogy is think of painting a pole with slow smooth motions not missing painting any areas, similarly applying to all the root surface. - Ask the patient to bite gently, or apply light air/water to the tooth and rate the level of pain or pain relief and if there any areas that need more attention. Reapply as needed to any additional areas or over the existing areas for a second round until the patient experiences relief.
Pain is titratable, meaning that several teeth may require reapplication due to hypersensitivity and with re-application, over 96% of patients have shown significant pain relief. Please note in patient that are experiencing severe pain or irreversible pulpitis, it has been clinically shown to reduce pain but may require application times on the root surface or tooth of up to 4-5 minutes per tooth affected. - Turn off the device by holding the power button for 2 seconds. The blue light will blink three times meaning the device is powering OFF.
- Discard of the dental sleeve used on the device for treatment, clean the device, and put the protective cap (provided in package) back on the device. Store the device in packaging box.
The Dental Pain Eraser has been shown to be effective in minor caries control, and in not intended for deep caries removal that is close to or has pulpal involvement. It is to be used as an adjunct to assist in providing a fast needle free alternative to minor caries control and restoring vital teeth with limited carious involvement, included filling replacement, broken cusp, or tooth repair.
DENTAL HYPERSENSITIVITY, RECESSION/THERMAL SENSITIVITY
Tooth Pain related to orthodontic de-bonding (high speed air use), tooth sensitivity during dental procedures (air/water sensitivity of exposed dentin structure), scaling and ultrasonic cleaning appointments, periodontal procedures with root sensitivity/soft tissue sensitivity.
Case Observation:
Case 1 – Recession: Patient is experiencing sensitivity to cold during ultrasonic scaling due to moderate generalized recession.
Case 2 – Orthodontic De-bonding Pain: Pressure related to physical removal of bands and brackets and cold water and air sensitivity during polishing procedure of the complete dentition.
- Cover the Dental Pain Eraser (DPE) with a dental sleeve (this sleeve is not provided in the package with the device) and expose only the 2 probe ends.
- Turn the device on by pressing the on button. You will see a blue light that will stay on for 1 second, this means the device is now powered ON.
- (Once the blue light starts blinking, the device is ready to use) Place the two metal probes on the tooth surface with intact enamel or natural tooth surface. It is recommended that the buccal/facial surface at midpoint be used in the anterior and the largest posterior cusp with natural tooth surface present. Apply 20 seconds per tooth to ensure blocking pulpal pain signaling fibers.
Special note: Ensure you are on natural tooth surface. Large restorations will affect the ability to transmit pain blocking potential to pulpal nerves. Envision how to apply signal on tooth to avoid blocked signal effect (Place more gingivally or on cusp not affected by restoration).
In some cases you will need to apply the Pulse-Wave and probe tips directly on the root surface to communicate with the neural network via the periodontal ligament and supporting structure.
Place the two metal probes on the area of gum tissue (gingival attachment) visualizing the roots of the teeth you are trying to relieve the pain.
Using slow light contact, move the probes up and down the whole root surface visualizing as you are “erasing” every part of the root surface vertically and side to side. Apply the 2 probe tips for 30 seconds on the buccal and the lingual root surface of the tooth.
A good analogy is think of painting a pole with slow smooth motions not missing painting any areas, similarly applying to all the root surface.
Orthdontic Debonding: Buccal and lingual application of probes 30 seconds, most recession is only buccal for 30 seconds. - Move to the next tooth that may be experiencing discomfort and apply the pain “erasing” in the same manner. Dental hypersensitivity is sometime regional and clinical evaluation/ parameters will be used the same for each tooth that is affected. The procedure will be more fluid and quick once the clinician is aware of time needed to block the sensitivity on the first tooth.
- Ask the patient to bite gently and rate the level of pain or pain relief and if there any areas that need more attention. Reapply as needed to any additional areas or over the existing areas for a second round until the patient experiences relief.
Pain is titratable, meaning that several teeth may require reapplication due to hypersensitivity and with re-application, over 96% of patients have shown significant pain relief. - Turn off the device by holding the power button for 2 seconds. The blue light will blink three times meaning the device is powering OFF.
- Discard of the dental sleeve used on the device for treatment, clean the device, and put the protective cap (provided in package) back on the device. Store the device in packaging box.
CANKER SORE, APHTHOUS ULCER
Case Observation:
A patient has complained of mouth pain due to a canker sore on the inside of their lower lip.
- Cover the device with a dental sleeve (this sleeve is not provided in the package with the device).
- Turn the device on. You will see a blue light that will stay on for 1 second, this means the device is now powered ON.
- (Once the blue light starts blinking, the device is ready to use) Apply the two metal probes on the area around the canker sore using circular slow motion for 20-30 seconds ensuring that you do not touch the inflamed sore part (outside defined canker sore margin) and staying on intact tissue.
If the patient does not feel the pain start to go away, continue applying the device in the same circular manner for an additional 20 seconds. It has been clinically shown to relieve pain in 96% of patients with canker sore. - Turn off the device by holding the power button for 2 seconds. The blue light will blink three times meaning the device is powering OFF.
- Discard of the dental sleeve used on the device for treatment, clean the device, and put the protective cap (provided in package) back on the device. Store device in packaging box.
The same technique is used for abrasion in the oral cavity due to sore created by an orthodontic appliance or denture.

Jenna B., RDH –
I was able to use this on my first patient last week! I had previously seen this patient and they had some sensitivity with their initial visit with me. At their second visit with me, we were doing SRP. I decided to offer this new device to him & he was excited & hopeful – just as I was to use it for the first time! The dental pain eraser demolished his pain & sensitivity. The patient was relieved to not be numb for the appointment, plus several hours after. In the words of my patient “This was a pain free experience today! I’m so glad I didn’t have to get a shot!” I will be using this on so many of my patients in the future!